

By Todd Lane, Assistant Track and Field Coach, LSU
@lsutoddlane
Carl Valle recently wrote about resistance training, and I wanted to follow up on his thoughts. Resistance running has long been a part of sprint training programs. Parachutes, hills, bungees, sleds, tires, weighted vests, and simply running into the wind are some frequently used methods. In a simplistic way of thinking in athletics, bigger is better, more is better, heavier is better.
But this way of thinking has to change. I’ve always believed that resistance sprinting should involve lighter weights than what has commonly been accepted. Yet for some reason, we have a hard time believing that lighter and faster is more beneficial than slow and heavy.
Mechanics of Sprinting
Here’s a brief review of general acceleration and sprint mechanics and what is desirable:
- Pelvic neutrality or very close to it, depending on where the athlete is in the cycle, from acceleration to upright vertical maximum velocity sprinting. We should see straight powerful lines, from the head through the spine and pelvis all the way through the ankle when imparting force into the track. Pelvic positioning also plays a HUGE role in being able to apply and receive forces in sprinting.
- Foot contact occurs underneath the center of mass, or slightly in front if you want to be technical.
- Ground contact in acceleration is slightly longer than in vertical maximum velocity sprinting, but either way it should be brief.
- In vertical maximum velocity vertical sprinting, a key checkpoint is that the knees cross directly under the body. This indicates good front side mechanics.
- To run fast, the saying goes, you must train fast. As we sprint, there is a great synergy of motor neurons firing impulses to the fibers in a coordinated pattern. Muscle-tendon stiffness plays a role in stretch-shorten cycling. This happens with shorter ground contact times and better pelvic positions.
The further away from these principles we get, the less we are truly training sprinting and the more we are doing strength training. The stimulus in resisted sprinting should be just enough to effect change in the system, without altering mechanics. With lighter resistance, we see mechanics with a complete resemblance of accelerating and sprinting (see pictures below). The firing patterns that take place in a crucial and critical order are adhered to and trained. If athletes are not training those patterns, they aren’t enhancing their sprinting.
My observation of resistance sprinting over many years has been that the greater the resistance, the more the degradation of the mechanics of acceleration and vertical maximum velocity sprinting. This is reflected in:
- Losing pelvic alignment after the first step. The pelvis wants to rise with each step, but athletes inherently keep their chests down because of the load as they try to push and drive longer. This becomes self-defeating because they still hold the same position at 20, 30, and 40 meters. This loss of pelvic alignment means poor force application and ground contact times that are too long. The result is that athletes don’t develop momentum and become exponentially worse mechanically.
- Individual differences in the way each athlete moves the resistance. Typically the stronger, more powerful athletes are more efficient than those who are less strong and less powerful.
Individualization
It can be hard to individualize when one coach has to work with many athletes. The “one size fits all” principle fails them. In reality, with the right set-up it is not that hard to individualize resistance sprint training. It shouldn’t be based on weight of the athlete, but rather the athlete’s time between non-resisted and resisted running. This can be individualized very easily. Coaches do it all the time in the weight room. Resistance is individualized based on maximum efforts through testing. I will discuss later how to individualize resistance run training.
Types of Resistance Training
I divide resistance training into two areas. One is acceleration development. As we know, acceleration for most athletes lasts for 40 meters. In acceleration training, I try to get athletes to effectively cover as much ground as they can by imparting large forces into the ground to project the body forward and upward with each step.
Working at a speed 8-10% slower than non-resisted allows the athlete to emphasize pushing and still maintain the mechanical aspects to keep the run fast. With a load, the acceleration distance can be pushed out slightly further because the body does not reach a vertical position as early as it would without resistance. Among the elite athletes I work with when doing acceleration-specific work, the men generally work in the 27.7 lbs (12.6 kg) range . For women it is 16.8 lbs (7.6 kg). These numbers show you how light, “light” really can be.
The other area is speed development, the zone from 40 to 60 meters. This zone is most effectively trained at a speed 3-8% slower than non-resisted runs. The challenge with resistance running is that athletes typically have a longer acceleration phase because of the resistance. They often never get completely vertical. Lighter resistance allows them to actually complete acceleration and get to vertical.
I have even played around with something I saw a fantastic Norwegian coach and his athlete do at our track during a winter stay. The sled rests on a small wheeled dolly, something like a garbage can sits on. The dolly has 25 meters of rope attached to it. One end is tied to something on the side of the track, such as a post or heavy hurdle.
The athlete starts the run with the sled on the dolly. As the rope reaches its end, the dolly comes to an abrupt stop and the sled slides off. This allows the athlete to accelerate in good position and develop momentum without having to overcome the resistance, arriving at the maximum velocity phase in a better position. For the men I work with, the weight is 16.7 lbs (7.6 kg), and 8.2 lbs (3.7 kg) for women. Again, these numbers show how light, “light” truly should be. Your numbers may (and should) be different, based on ability and surface.
Determining the Weight
- Have your athlete run 60 meters. Time the first 40 meters and the second 20. The first 40 meters is roughly your acceleration zone and the second 20 your vertical maximum velocity zone. Younger and/or less elite athletes may go 50 meters instead, timing 30 and 20.
- Have them do resistance runs for acceleration and keep changing the weight based on the times they achieve. You are aiming for that 8-10% difference, much less than what people generally think is necessary. If the athlete runs 5.10 for un-resisted 40 meters, the resisted 40 should be no slower than 5.60.
- Repeat on another day for your maximum velocity zone, aiming for the 3-8% difference.
- Remember that the weight includes the sled.
- If it doesn’t look right, then COACH, COACH, COACH mechanics.
Creating New Toys
Sleds in training catalogs are too heavy for my purposes. So I had our campus facility people make 10 sleds of 1/8-inch aluminum measuring 20 x 14 inches (50 cm x 35 cm). The front 3 inches were lipped up at 45 degrees, with two holes to attach the harness. A welded post 2 inches (5 cm) in diameter and 5 inches (13 cm) tall in the center holds additional weight. The sled itself weighs 3.5 lbs (1.6 kg). Adding the chain, rope, and belt to attach to the athlete brings the total weight to 5.7 lbs (2.6 kg).
Testing
Any training program needs testing to measure athlete progress, readiness, and overall effectiveness. Resisted run training can be part of any training and testing plan. Time the same distance with the same weight throughout testing periods to measure changes, just as you would with non-resisted runs. As with any test, consistency in climate, surface, and timing equipment is important.
Workouts
Resisted sprinting allows training to complement non-resisted sprinting. Here are several sample workouts. They all start from a crouch, hanging crouch, or 3 or 4 point start with the slack taken out of the rope to the sled.
Acceleration Development Specific @ 8-10% difference
- 4 x 40m resisted, 2 x 20m, 2 x 30m, 2 x 40m non-resisted
- 2 x 40m resisted, 2 x 40m non-resisted, 2 x 40m resisted, 2 x 40m non-resisted
- 10 x 40m resisted
Speed Development Specific @ 3-8% difference
- 1. 2 x 50m resisted, 2 x 20 meter “fly-in” run with 30-meter acceleration
- 2. 2 x 50m resisted, 2 x 90m ins/outs
- 3. 2 x 30m “fly-in” resisted run with first 25 meters on dolly, 3 x 30m “fly-in” non-resisted run
Two sets of pictures. Kinematically, there is very little (if any) difference between resisted and non-resisted.

Figure 1: Athlete resisted acceleration with 18.8 lbs/7.6 kg weight sled.
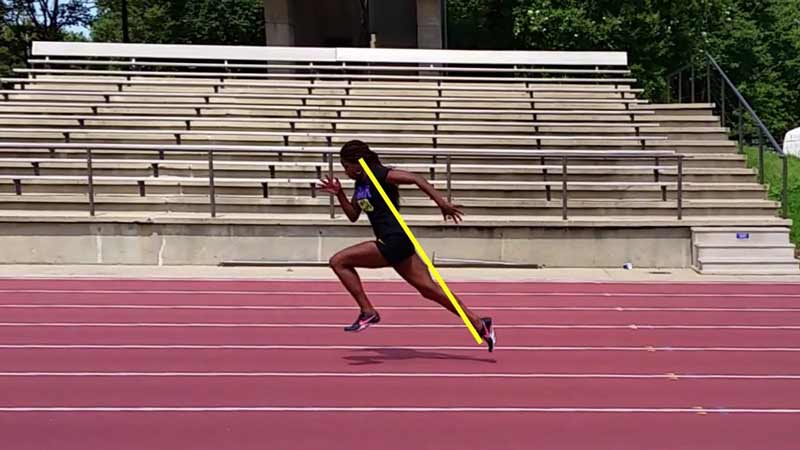
Figure 2: Athlete non-resistant acceleration.

Figure 3: Athlete vertical maximum velocity with 8.7 lbs / 3.7 kg weight sled. Touchdown is slightly in front of center of mass.
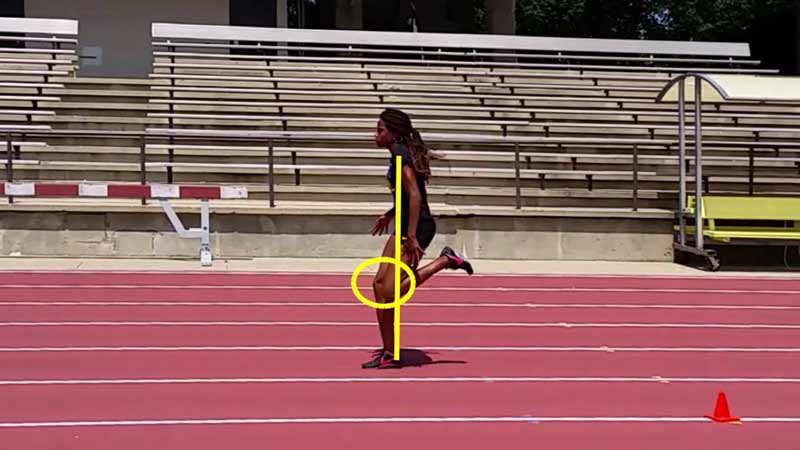
Figure 4: Non-resisted vertical maximum velocity.

Figure 5: Top view of custom made lightweight sled.

Figure 6: Side view of lightweight aluminum sled.
Please share this article so others may benefit.
[mashshare]