By Carl Valle
In my previous article on the value of maximal speed development, I argued the case for quality as a foundation. In this article, I will share how to do it properly, as most coaches and athletes simply measure Top Speed or Maximal Velocity. Down the road, coaches want to know about training maximal velocity (loading and planning) and coaching (instruction). Before we jump the gun, let’s make sure we know what we are dealing with.
Definitions of Absolute Maximal Velocity versus Submaximal Velocity
If you ask athletes how fast they are, the answer is likely to vary by sport and background. American football players will share their 40-yard dash time, sprinters their best 100m (with or without wind), and pro soccer players the speed they reached in a game in kilometers per hour. So the best way to assess max velocity is to get specific about what trying to run as fast as possible really means.
Short sprints are acceleration tests, and a mile run is an endurance test. Yet some coaches evaluate player speed by using the wrong distance and testing setup. Even if coaches follow the guidelines in this article, they are not evaluating maximal velocity because anytime one tests in training, they are only getting a glimpse of potential. The timing of the season means coaches are likely not getting someone’s best absolute time, as would happen in a race, so they must understand that their athletes are not displaying absolute abilities.
Submaximal velocity simply refers to practice times, but you should never use that term with athletes. Or if you are an athlete, don’t think about personal bests in training. Some coaches and athletes extrapolate by using practice times to predict what one can do, and that is possible. But the best way to look at it is simply trying to get better each year through a good training program, rather than artificially improving testing by chasing numbers.
Requirements of a Maximal Velocity Test
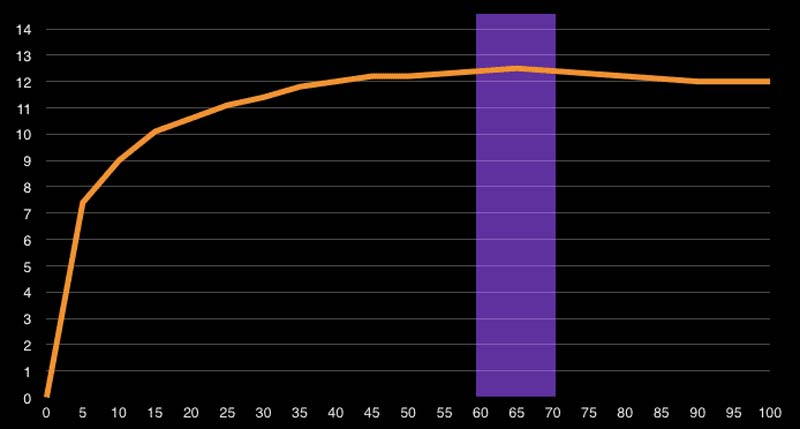
Team sports can use a shorter sprint to get maximum speed. While 40m is a good start, you need 70m for a full-out evaluation. Use the distance you need, but 20m run-ups are not cutting it.
The first step in setting up a true speed test is to appreciate that you need enough distance to measure an athlete’s maximal velocity. Time after time I watch coaches use timing gates or cameras to time speed, yet they don’t measure the required acceleration zone or standardize the process. The most important quality of a test is that it can be repeated, with the setup as similar procedurally as possible each time. I am horrified when major programs don’t replicate seasonal testing properly. If not, the data is nearly useless because it’s lost the opportunity for year-to-year comparisons of an athlete’s ability. The truth is that a good maximal velocity test is not difficult to perform. Here are the requirements:
You must have enough runway – Use an 80m straightaway or longer. While athletes may claim they will run through a brick wall for their coach, that never happens. Subconsciously, athletes can’t hit true maximal effort when they face a cement wall. To test speed, you need acceleration distance, a maximal velocity zone, and enough room to safely decelerate. Having plenty of space removes inhibitions or tightness. Also, ensure that the sprint zone is not in the middle of a high-traffic area where people are walking back and forth. Set up cones and have someone enforce the safety of the athletes at all times.
Measure segments carefully – I always bring a tape measure and mark off 10m segments. Some facilities allow you to add permanent marks for convenience, but in most cases you will have to measure each zone over and over again. 10y marks are easier for American football because the field and hurdle intervals are readily measured and labeled. Coaches should measure 30, 40, 50, 60, and 70 segments to capture maximal velocity. You need to know terminal acceleration and initial deceleration to measure the athlete’s full speed. Most athletes in team sports hit maximal velocity around 40-50m if they are fast and properly trained. Elite sprinters hit it about 10 meters later. Remember that practice is a different beast, and some athletes only bring out their top speed at meets or games. Coaches, therefore, need to look for improvements in testing over time, not necessarily if their athletes are hitting their best times at those zones.
Record all conditions of the day – The most obvious record for outdoor testing conditions is weather, but similar information should be included for indoor facilities. Athletes arriving late from a snowstorm will be a distraction, or a damp area can spook athletes. In addition to the environment, have a short checklist of feedback questions for the athletes. If you monitor physiological conditions, look at the trends before and after the session for a better perspective. Some coaches use extensive muscle and nervous system readiness, and a few subjective statements from advanced athletes is a good idea.
Testing the Athletes
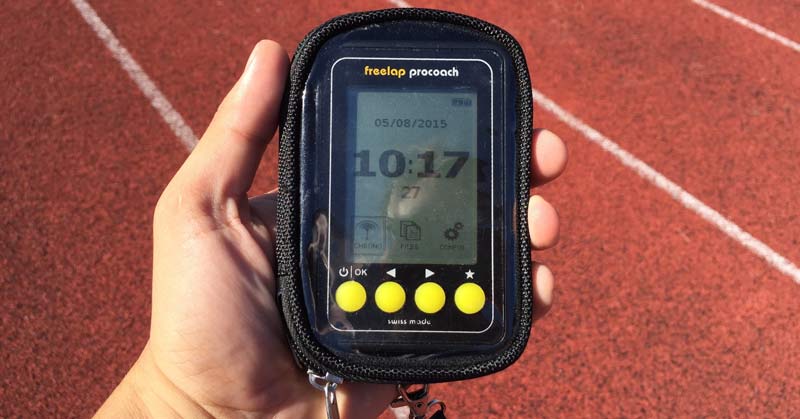
Administrating the testing process is hard because you need instant feedback to ramp up the speed incrementally. Athletes may take 4-5 sprints to hit top speed though some may hit it earlier. That is fine. You need considerable management to keep athletes from fatiguing by trying to do something more than just run fast. Top speed is strange since once an athlete hits close to maximal velocity, the sensation of not accelerating can be strange or foreign even for experienced sprinters. Think about being on a plane cruising at 500 miles per hour. It’s fast but doesn’t feel like anything. Instant feedback of speed and visual clues can help throttle up effort, especially in the acceleration phase. Many athletes forget that top speed isn’t about running upright, it’s about powering out smoothly to carry momentum through the zone.
Without times, even athletes who are aware of their body in time and space are not perfect, so one has to provide times. Some athletes relax so much they look like noodles and run slow while others consciously try to relax and tighten up instead. It’s a learning, training, and evaluation process that must be repeated for maximum effectiveness.
Where am I going with this? You might think that setting up cones and lining up athletes is a no-brainer but even the basics are harder than I once thought. The reason? Besides running one person at a time and getting times on a clipboard, it is difficult to know if someone is, in fact, running maximally unless they are getting splits.
Breaking Down Performance Analysis After Timing
I have done speed testing of athletes for years and like the idea of filming in conjunction with timing gates. Having only one data set (video or velocity) tells just one part of the story, so investing in both is wise. The problem is not the availability of technology; it’s availability of expertise and experience to ensure the accuracy of video information. Too often I see coaches with smartphones thinking they are biomechanics experts just because they have a camera. Drawing shapes on a tablet without best practices and quality data is no different than a toddler finger painting.
The obvious need is to get the fastest 10m split and use that as a benchmark and goal for improvement. Team sports like to convert the split into running speed, and that is fine. See chart below for easy conversion.
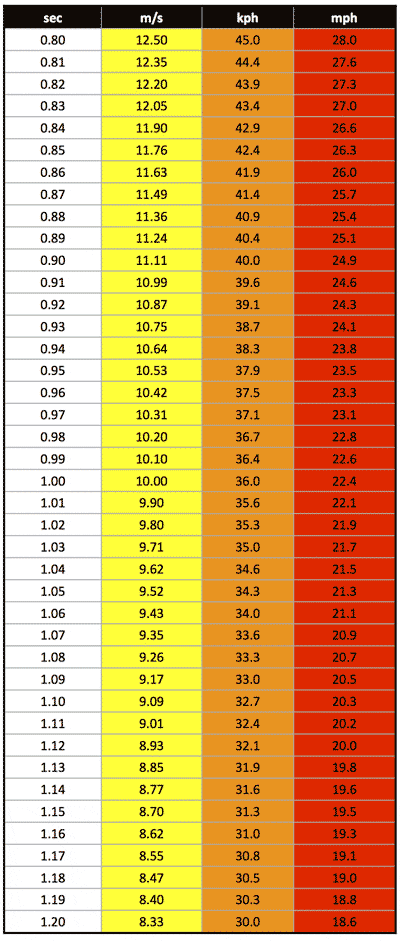
100-meter splits converted to running speed.
Breaking down splits is easy with Freelap as the work is automated, but coaches worth their salt want to know why instead of just getting raw data. I have written about the Key Performance Indicators in Hurdling for SpeedEndurance, but sprinting is very straightforward. Coaches can break down video into an array of metrics. I prefer starting large, then zeroing into smaller details. Stride parameters are reactions to speed development and not things one can adjust as they are resultant metrics, but it’s good to study them to ensure the body is functioning mechanically.
Stride frequency – The first parameter is stride frequency. The goal in analysis is not to tinker with taking faster steps, but to determine the natural rate of steps in a fly during a career. Stride frequency increases by barely perceptual margins, so a 10.20 to 10 sprinter will make changes of a quarter-step at best. With contact times of about a tenth of a second, we are talking how a hundredth alone over a course of 100m can dramatically change performance. Film at 1200 frames per second can see this, but the goal is to see changes over the course of years, not individual sessions.
Stride length – Since fly sprint distances are base 10m, you can take the frequency of the segment on video and estimate the length of each stride. You are likely to get a range from 2–2.3m, and the goal is to ensure the stride length demonstrates a relationship between body height and leg length. Like frequency, the result of the stride length is a product of speed and power, except when an athlete is severely restricted. Profiling athletes’ maximum performance speed-wise and seeing how they run provide baseline running parameters.
Mechanical Factors to look for
Harmony – While no metric exists here, you first need to see it live and then compare slow-motion later. Trust your eyes but measure to see if it’s worth addressing. Treat the athlete like a piece of art and don’t be too technical, just see if anything jumps out at you. I like to examine facial expressions but don’t try to read too much. Some aggressive athletes do great with relaxation while a trance or sleepy face at high speed shows confidence and comfort—key factors in running fast.
Arm carriage metrics – Coaches may see the arms as parts of the equation that don’t provide much to the sprint cycle. While that may be true, I have yet to see a world-class sprinter with lousy arm action. Arm action mirrors leg action. Because the body wants to be synchronized, it’s important to see if the volitional efforts are allowing for good running or ruining potential. Arm action is a reflection of the free leg swing during recovery, so check the distance and height of the hand away from the head for balance. A relationship exists between the arm action and stride length and frequency, but it’s more of a reaction to good sprinting and can’t be cued or trained. The humerus and femur are coordinated because of anatomy, so review those positions first. Don’t copy other sprinters too much since builds and limb lengths are not the same. With high-speed film, look at ground contact times and oscillation of the head and arm swing. The dead spot or switch time between pulling and relaxing is less than .001, showing how amazing the body is.
Posture metrics – Measuring posture isn’t easy, as individuals have anatomical and style variables. A good idea is to see a general tall position cycling between a lean and true vertical. As triple extension is a bit of a myth, tall running the entire distance is too rigid and artificial. Core training strengthens and improves the function of the body, so put more coordination into it. Having the head directly above the pelvis during the stride cycle is fleeting, but it’s a milestone.
Leg action metrics – Knee height and hip extension distance are common subjects in the world of track and field. But the hip positions Ralph Mann speaks of don’t apply as well to other sports, especially soccer. Mann’s data is fairly accurate with elite sprinters though the kinematic data is a chicken-and-egg thing with elite power and talent. What one sees on the screen is due to being fast, not the reason they are achieving those positions and angles. Heel recovery should be minimal on the butt kicking, or how far the knee and heel are from the pelvis with backside mechanics. Front side mechanics is more of a relationship of keeping the pelvis in control, rather than doing hip flexor exercises or drills. Athletes with excessive backside mechanics need to do more running and always see if this problem is symptomatic of restrictions or injuries. Some natural lordosis will increase excessive backside mechanics but does so by losing head position.
The Master Checklist
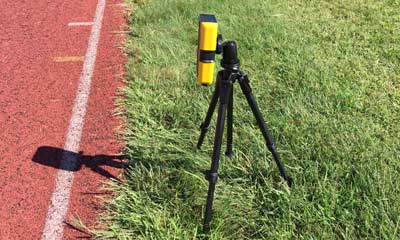
I hate doing cheat sheets or similar lists, and I prefer that people make their own. But since I have finally developed one, it’s selfish not to share. Here are the six mandatory elements of doing a fly test.
- Fresh athletes – Injury risk increases when doing any maximal sprinting work, so a small unloading of volume and intensity makes testing safer. No guarantees, though, since fast sprints—even when rested—are not a ticket to injury-free running. Make sure your athletes thoroughly warm up and manage any who have lingering issues. I have a binary decision-making approach: either you can sprint, and it’s wise to do so, or you can’t and the risk isn’t worth it. Alternate workouts and going a little harder in the weight room are good secondary options when athletes aren’t ready.
- Facilities/equipment ready – Even if you are the track coach, the track is not yours. It belongs to the organization or school, and this can be frustrating if an outside event pops up randomly. I have been in a situation when the governor visited with little advance notice. The track was shut down after I had waited for weeks to have a hard workout. So be sure to coordinate with everyone, not just the athletic staff. Also, make sure you count and prepare every cone, table, and necessary piece of equipment. I now keep my own equipment in my car. I have organized things the night before and laid everything out, only to discover that a morning conditioning program had taken items I had purchased.
- Pro system and cameras fully charged – I always charge everything for 12 hours the night before. While you can plug equipment into walls and computers, I don’t like being without a backup plan for juice.
- Video back-up prepared – Coaches need four small cones on average to create visual reference points. Due to the parallax of the camera, line up the video, so the middle of the fly segment is targeted and zoom in from a long vantage point to improve the accuracy of the visual data. In five years with Freelap, I have missed two splits. That’s less than one percent of one percent, but always have a backup option as it makes things fail-safe.
- Managers and support organized – People are essential to technology. While great protocols and procedures are important, experienced and energetic support makes or breaks things. Sometimes it’s a grind to get a large group properly warmed up and trained, so make sure you have help. Much of coaching is crowd control. If everyone involved sticks to their job, things will run much smoother.
- Be in party mode – Make sure the process is fun and rewarding. Timing of any sporting event is a test, but it shouldn’t feel like taking the SATs or going to the dentist to pull out a tooth. Make it fun while keeping things focused and goal-oriented. Athletes getting tested with electronic timing or having a dedicated coach doing video and technique breakdown should feel special, yet still give their undivided attention to the process.
Other details are more individual to the program, but I have hand-timed in high school and filmed in college, and it was a burden. While hand times gave instant feedback, I hated giving the data out and filming with a chronometer is slow. While I have moved on from counting frames to measuring points with an iPad, instantly organized splits are a dream come true. I have tested entire teams and from warm-up to finish I was done in about an hour. After 30-40 minutes of preparation, 20 minutes of pure sprints should get 15 athletes tested three times.
Parting Thoughts on Maximal Velocity Evaluation
It’s not shocking that I don’t often do max testing. Pure all-out sprinting is taxing, and with long competition schedules it’s hard to fit in. Still, even if you do maximal velocity testing only a few times a year, you will 10-12 data points of how you athletes’ abilities are improving over the period of an Olympic cycle. The speed or time split is not a number that means one will break a world record or even extrapolate perfectly to better performances, but it is the best option to determine if they are improving their core abilities.
Please share this article so others may benefit.
[mashshare]


Hi Carl
I like your article. Can you explain how this test is done? I didnt get it. You have 10 m segments up to 80 meters. What does the athlete do? Accelerate from the beginning or is there a buildup and the athlete sprnints the rest of the way. Can you clarify?
Thank you.
Accelerate as hard as one can control (not wild or foolish). Choose the departure start (standing, crouched, or three point/blocks).
Great article from great coach.Thanks Carl.